The Great MicroSD Card Survey: One Year Later

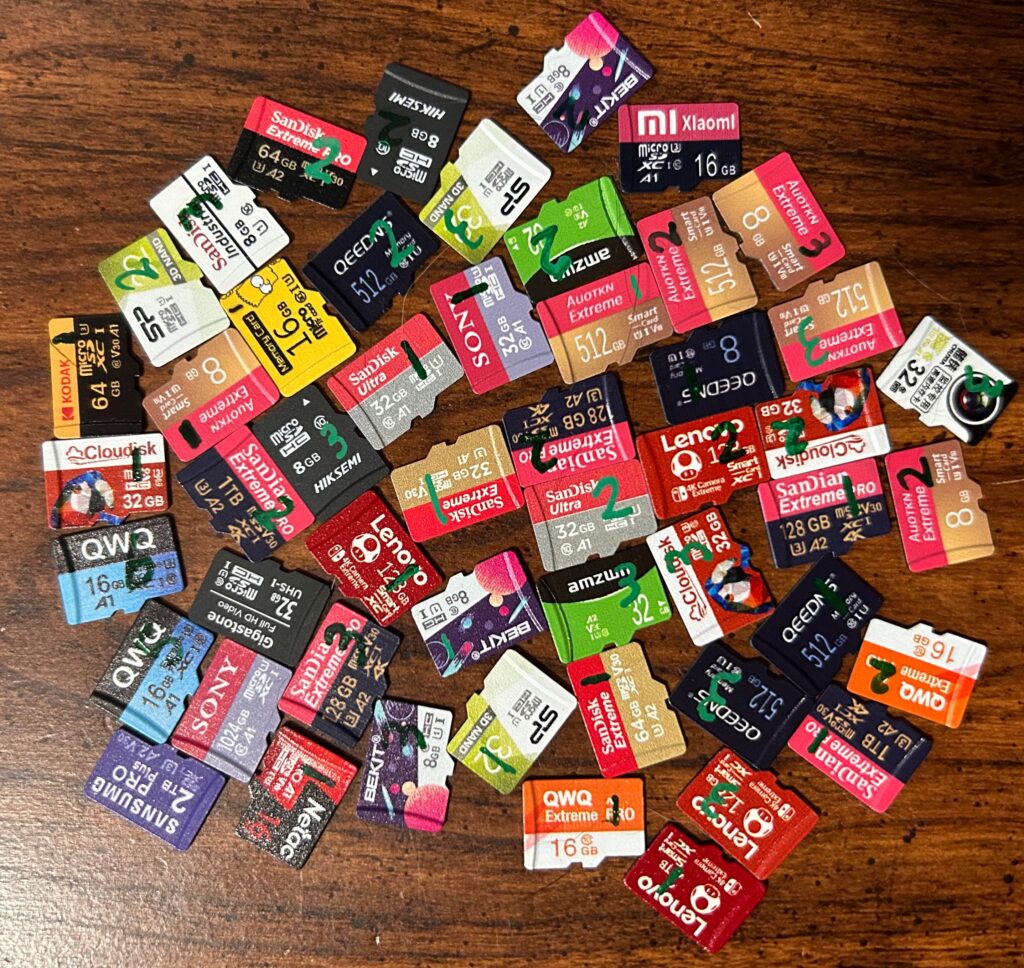
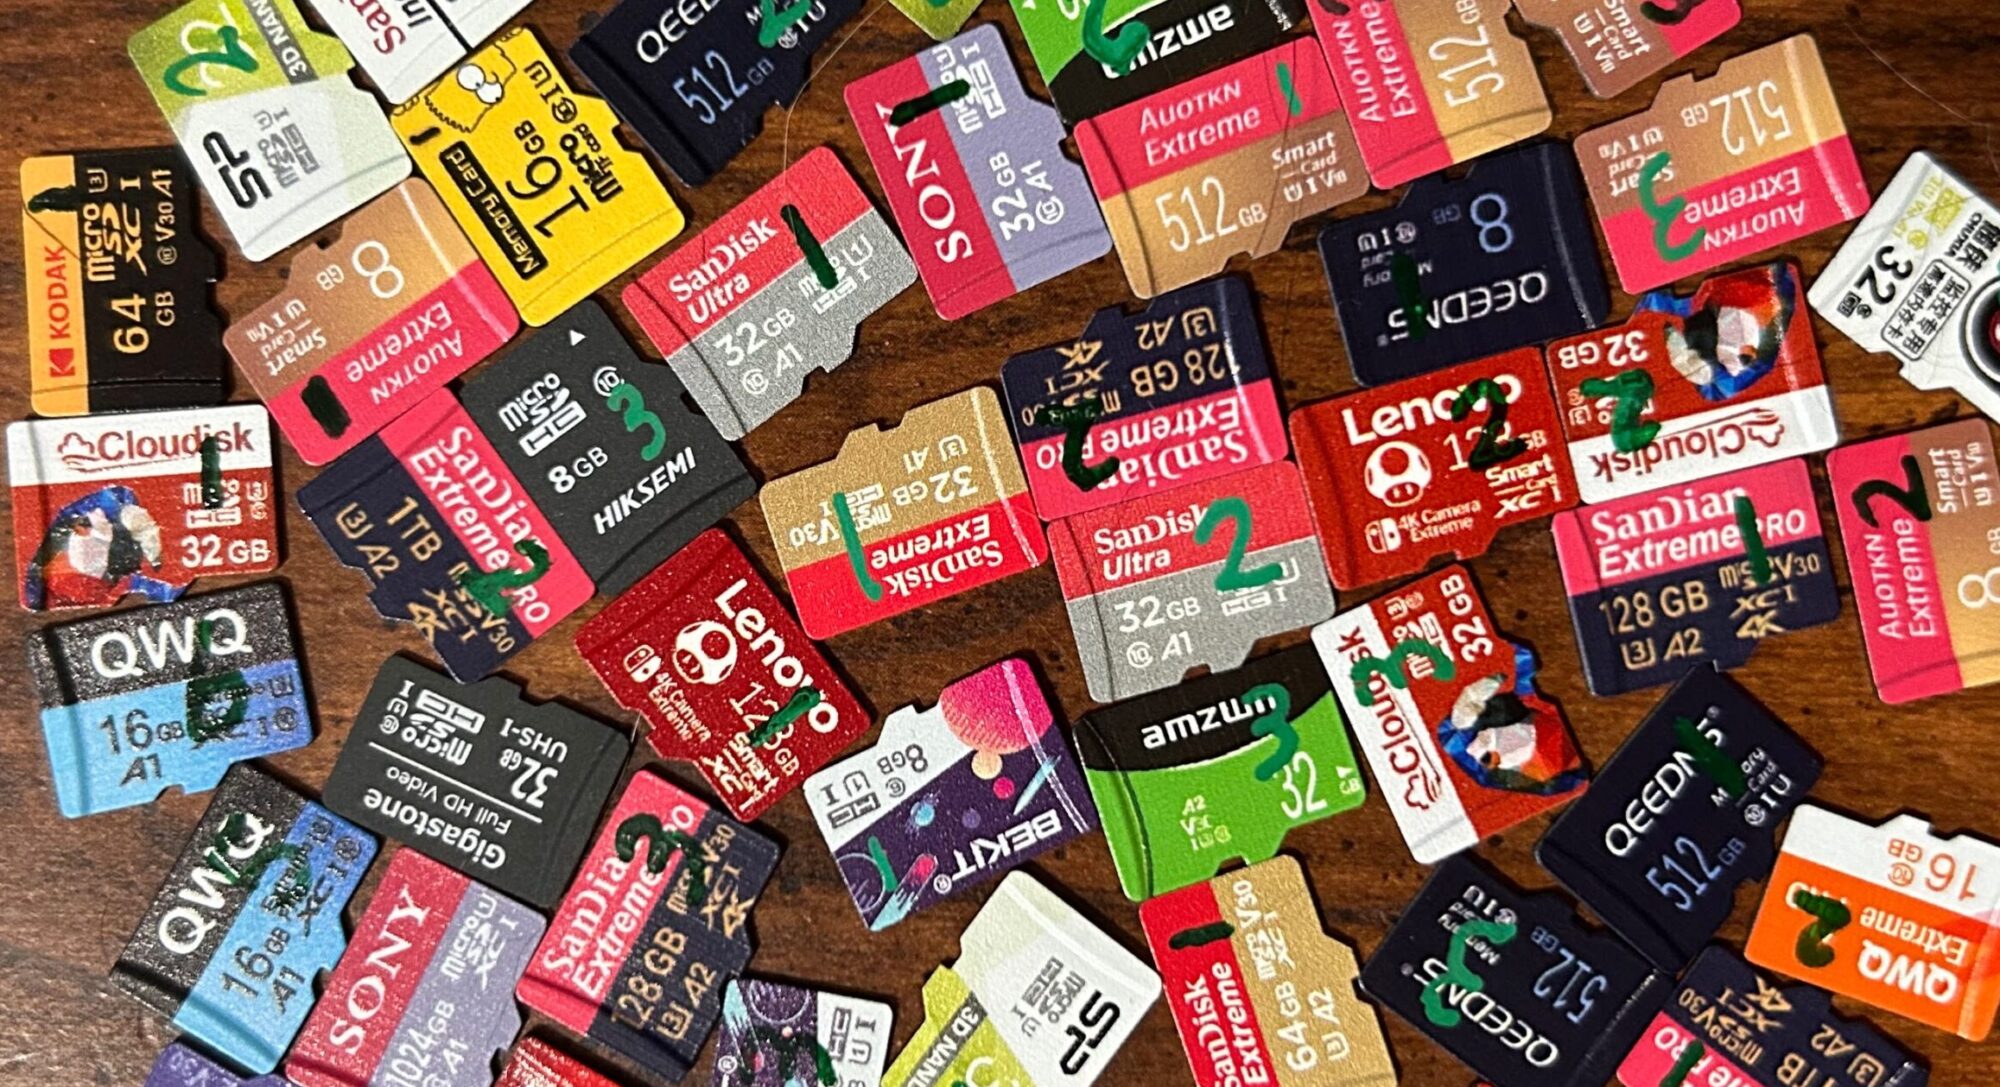
It’s been exactly one year since I started this project. I’ve set up 8 machines with close to 70 card readers running around the clock. I’m writing 101 terabytes of data per day. I’ve written 18 petabytes of data to 181 microSD cards and destroyed 51 of them. Don’t believe me? Check out my graveyard:

On the anniversary of this project, I thought it might be good to do a retrospective and cover things I’ve learned in the last year.

Continue reading “The Great MicroSD Card Survey: One Year Later”

SD Card Manufacturer IDs

If you’ve been following my microSD Card Survey, you might have noticed that I publish manufacturer IDs for (almost) all of the cards that I’ve tested (save a few where they came DOA or where I tested them before I thought to dump the registers off the card).

I know that there are other resources out there that have compiled lists of SD card manufacturer IDs, but I thought I’d publish my own based on what I’ve seen during the course of my testing. So without further ado:

Manufacturer IDOEM ID(s)Associated Brand Names
000000Auotkn, “Lenovo” (knockoff), QEEDNS, QWQ, SanDian, Somnambulist, “Sony” (knockoff), “Xiaomi” (knockoff) — pretty much any fake flash vendor who wants to cover their tracks.
003000Auotkn
003432 (ASCII: 42)Somnambulist, Gigastone, “Sony” (knockoff)
02544d (ASCII: TM)Kioxia (formerly Toshiba)
035344 (ASCII: SD)SanDisk, WD
05000c“Lenovo” (knockoff)
1b534d (ASCII: SM)Samsung
1d4144 (ASCII: AD)ADATA
2715048 (ASCII: PH)HP, Lexar, Kingston, PNY
2824245 (ASCII: BE)Lexar
565344 (ASCII: SD)Auotkn, QEEDNS
6f0303Hiksemi, Kodak, Microdrive, Netac, XrayDisk
744a60 (ASCII: J`)Transcend
890303Netac
9f5449 (ASCII: TI)Amzwn, Kodak, Kingston, Silicon Power
ad4c53 (ASCII: LS)Amazon Basics, Chuxia, Lexar3, OV
df2306Lenovo
fe3432 (ASCII: 42)Auotkn, Bekit, Cloudisk, Reletech, HP

1Multiple sources attribute this manufacturer ID to Phison. While I don’t disagree, I just haven’t come across any Phison-branded cards yet.

2The cards tested here dated to before Lexar’s sale to Longsys.

3The cards tested here dated to after Lexar’s sale to Longsys.

I’m destroying a bunch of microSD cards. For science.

Today, I’m posting the preliminary results of a project I’ve been working on for the last six months now. For lack of a better name, I’m calling it The Great microSD Card Survey.

Think of it as the answer to such questions as “just how good are microSD cards that you buy off of AliExpress?”, or “just how long should I expect an SD card to last?”, or “what’s the best microSD card you can get for under $15?”, or “why did Matt spend SO MUCH MONEY on microSD cards just to destroy them??”

I’ve poured a lot of time and effort into this project, and I hope that at least one person finds it useful.

For science!

PayPal Country Availability

Updated 6/30/2022

I get questions a lot about what PayPal users in any given country can do.  Admittedly, PayPal doesn’t do a very good job of advertising this.  But hopefully, I can help shed some light on this.  (There used to be a page you could access that would show you what PayPal supported in any given country.  It’s still there — because we asked for it to be reinstated after it was taken down — and you can still access it if you know the URL; however, I’m not sure that the information is updated any longer.)

Disclaimers:

  • This information is accurate to the best of my knowledge on the date that this post was made; however, this information is subject to change and you should contact PayPal for official information on features supported in any given country.
  • This does not go into any sort of info on what you might have to do before you can access certain features (e.g., whether you have to verify your account to be able to send/receive money, etc), what you can/can’t sell in a given country, or what specific payments processing products are available in any given country.  This is just intended to be a general overview to say “PayPal might or might not be able to do what you want to based on the country you live in”.
  • The “countries” listed here might be regions or territories that are governed by another country.  However, PayPal treats them as separate countries for most purposes.
  • Some countries might not exist anymore or might go by another name.  I believe PayPal still treats them as if they did exist and operate under their previous name.
  • This is not an exact list — capabilities vary by country.  (For example, users in Brazil can hold Brazilian Real in their PayPal account, but users in other countries cannot.)
  • Country lists will be in alphabetical order according to their ISO 3166-1 alpha-2 country code (even though I use the name of the country instead of their country code).
  • This is not an official statement by PayPal.  This is just my attempt at being helpful.

PayPal groups countries into one of five groups (in order of “most restrictive” to “least restrictive”):

  • Group A
  • PayPal Zero
  • Group B
  • Group C
  • Localized

Let’s take a dive into each of these five groups:

Group A

Group A is considered “Send Only”.  This means that PayPal users can only send payments — they can’t receive payments (with the exception of refunds/reversals/chargebacks) and they can’t hold money in their PayPal account.  Typically, the only way you can pay for things is with a credit card.

As of the time of this writing, the following countries are considered Group A (note that these countries are in alphabetical order by their ISO 3166-1 alpha-2 country code, not their actual name):

  • Argentina
  • Aruba
  • Azerbaijan
  • Burundi
  • Brunei
  • Bhutan
  • Belarus
  • Congo – Kinshasa
  • Congo – Brazzaville
  • Côte d’Ivoire
  • Cook Islands
  • Cameroon
  • Djibouti
  • Eritrea
  • Falkland Islands
  • Micronesia
  • Gabon
  • Guinea-Bissau
  • Ireland
  • Cambodia
  • Kiribati
  • Comoros
  • Laos
  • Sri Lanka
  • Montenegro
  • Marshall Islands
  • Macedonia
  • Mauritania
  • Montserrat
  • Maldives
  • Niger
  • Norfolk Island
  • Nigeria
  • Nepal
  • Nauru
  • Niue
  • St. Pierre & Miquelon
  • Pitcairn Islands
  • Paraguay
  • Rwanda
  • Solomon Islands
  • St. Helena
  • Svalbard & Jan Mayen
  • Sierra Leone
  • Somalia
  • São Tomé & Príncipe
  • Chad
  • Thailand
  • Tonga
  • Tuvalu
  • Taiwan
  • Ukraine
  • Vatican City
  • St. Vincent & Grenadines
  • British Virgin Islands
  • Vanuatu
  • Wallis & Futuna
  • Samoa
  • Yemen
  • Mayotte
  • Zimbabwe

PayPal Zero

PayPal Zero countries are countries where users can send and receive payments, but can’t hold money in their PayPal account.  The name “PayPal Zero” refers to the fact that the user’s balance must remain at zero at all times.  If/when you receive payments, you must tell PayPal how the money will be withdrawn from your account; any time you receive a payment, it’s immediately withdrawn to that withdrawal method.  The exact list of withdrawal methods will vary by country, but I believe most of these countries support withdrawing to a credit card or a US bank account.

Note that PayPal Zero is an internal code name; you won’t see this name in any of PayPal’s public documentation.

As of the time of this writing, the following countries are considered PayPal Zero countries:

  • Antigua & Barbuda
  • Albania
  • Bosnia & Herzegovina
  • Barbados
  • Belize
  • Dominica
  • Algeria
  • Egypt
  • Fiji
  • Grenada
  • St. Kitts & Nevis
  • St. Lucia
  • Malawi
  • New Caledonia
  • French Polynesia
  • Palau
  • Seychelles
  • Turks & Caicos Islands
  • Trinidad & Tobago

Group B

Users in Group B countries can send and receive payments, and can do so in almost any currency PayPal supports.  If you’re in a Group B country, you can also open currency holdings in almost any currency PayPal supports — when you receive a transaction that’s denominated in a currency you hold, it’ll automatically get added to the balance for that currency holding.  From there, you can keep it in that currency or convert it to almost any of the other currencies PayPal supports.  However, the only withdrawal mechanism in many of these countries is to withdraw the funds to a US bank account — and the funds will get converted into US Dollars when that happens.  PayPal won’t allow you to withdraw the funds to a local bank and likely doesn’t support your country’s native currency.

As of the time of this writing, the following countries are considered Group B countries:

  • Andorra
  • United Arab Emirates
  • Anguilla
  • Armenia
  • Netherlands Antilles
  • Angola
  • Burkina Faso
  • Bulgaria
  • Bahrain
  • Benin
  • Bermuda
  • Bolivia
  • Bahamas
  • Botswana
  • Chile
  • Colombia
  • Costa Rica
  • Cape Verde
  • Dominican Republic
  • Estonia
  • Ethiopia
  • Faroe Islands
  • Georgia
  • Gibraltar
  • Greenland
  • Gambia
  • Guinea
  • Guatemala
  • Guyana
  • Honduras
  • Croatia
  • Indonesia
  • Iceland
  • Jamaica
  • Jordan
  • Kenya
  • Kyrgyzstan
  • South Korea
  • Kuwait
  • Cayman Islands
  • Kazakhstan
  • Lesotho
  • Lithuania
  • Latvia
  • Morocco
  • Monaco
  • Moldova
  • Madagascar
  • Mali
  • Mauritius
  • Mozambique
  • Namibia
  • Nicaragua
  • Oman
  • Panama
  • Peru
  • Papua New Guinea
  • Qatar
  • Romania
  • Serbia
  • Saudi Arabia
  • Slovakia
  • Senegal
  • Suriname
  • El Salvador
  • Swaziland
  • Togo
  • Tajikistan
  • Turkmenistan
  • Tunisia
  • Tanzania
  • Uganda
  • Uruguay
  • Venezuela
  • Vietnam
  • South Africa
  • Zambia

Group C

Like Group B, users in Group C countries can send and receive payments in almost any currency that PayPal supports.  And, like users in Group B countries, you can open currency holdings in almost any of PayPal’s supported currencies and convert funds between them.  The difference with Group C is that PayPal allows you to withdraw funds to a bank account in your country.

As of the time of this writing, the following countries are considered Group C countries:

  • Cyprus
  • Czech Republic
  • Ecuador
  • Finland
  • French Guiana
  • Guadeloupe
  • Greece
  • Hungary
  • Liechtenstein
  • Luxembourg
  • Martinique
  • Malta
  • Malaysia
  • New Zealand
  • Philippines
  • Réunion
  • Slovenia
  • San Marino

Localized

The last group, and the most feature-rich group, is the group of fully localized countries.  If your country is in this group, PayPal likely has a legal license to operate in your country, supports your country’s native currency, allows you to send, receive, and withdraw funds in your country’s native currency, has a full site that is translated into your country’s native language, and typically has support resources that speak your country’s native language as well — in addition to all the capabilities that Group C countries get.

As of the time of this writing, the following countries are fully localized:

  • Austria
  • Australia
  • Belgium
  • Brazil
  • Canada
  • Switzerland
  • China
  • Germany
  • Denmark
  • Spain
  • France
  • United Kingdom
  • Hong Kong
  • Israel
  • India
  • Italy
  • Japan
  • Mexico
  • Netherlands
  • Norway
  • Poland
  • Portugal
  • Russia
  • Sweden
  • Singapore
  • United States

What if my country doesn’t appear on this page?

Well…the likely answer is that PayPal doesn’t allow users in your country to use PayPal.  Sorry.

How I got a Ricoh Aficio MP C4502 Working on Mac OS X Mojave

Note: tl;dr at the end.

I recently came into possession of a Lanier MP C4502 (which is, as far as I can tell, just a re-branded Ricoh Aficio MP C4502). Thank god for government surplus. I have a Macbook that I use for work, and I wanted to see if I could get it to work with my Mac. My attempts were thusly:

  • Let Mac OS just detect and automatically install the driver. Well…turns out that the native Mac driver prints PostScript, and this thing didn’t come with a PostScript card — so the printer just tries to print the raw PostScript.
  • Install Gutenprint/Gimp-Print. It comes with a driver that works, technically…but:
    1. It doesn’t support all the options that this machine has, and
    2. It just uses a raster driver — and raster prints:
      1. Don’t come out looking quite as sharp (especially on the text), and
      2. Use up a lot of memory on the printer.

So I wanted to see if I could find a way to send PCL data to the printer instead.

I knew right off the bat that I’d probably need to use GhostScript, because GhostScript has a PCL driver built into it. I knew that OS X used CUPS as the underlying print system, so I started poking around trying to find where it kept its printer definition files (PPDs). It didn’t take me long to figure out that OS X copies them into /etc/cups/ppd at the time the printer is installed:

$ ls -l
total 7104
-rw-r--r-- 1 root _lp 21515 Aug 13 2018 HP_Officejet_Pro_8630.ppd
-rw-r--r-- 1 root _lp 41975 May 20 10:38 MPC_4502_w_Gutenprint.ppd

So now I could start tinkering around in with the PPDs.

I tried just adjusting the *cupsFilter line like so:

*cupsFilter: "application/vnd.cups-postscript 100 gs -sDEVICE=pxlcolor -dNOPAUSE -dBATCH -q -sOutputFile=- -"

Which didn’t work. At first, I thought it was because *cupsFilter wasn’t paying attention to the command line options I was providing; so I tried writing a simple bash script (called “pstopcl“) as a wrapper:

1
2
#!/bin/bash
gs -sDEVICE=pxlcolor -dNOPAUSE -dBATCH -q -sOutputFile=- -

And, for good measure, I did a sudo chown root:_lp pstopcl.

But this still didn’t work. When I went to go look at the CUPS’s error_log, I saw why:

D [20/May/2019:15:26:52 -0500] [Job 24] dyld: Library not loaded: /usr/local/opt/libtiff/lib/libtiff.5.dylib
D [20/May/2019:15:26:52 -0500] [Job 24] Referenced from: /usr/libexec/cups/filter/gs
D [20/May/2019:15:26:52 -0500] [Job 24] Reason: no suitable image found.  Did find:
D [20/May/2019:15:26:52 -0500] [Job 24] /usr/local/opt/libtiff/lib/libtiff.5.dylib: file system sandbox blocked stat()
D [20/May/2019:15:26:52 -0500] [Job 24] /usr/local/lib/libtiff.5.dylib: file system sandbox blocked stat()

So…I knew that there were some changes made to the printing subsystem in a previous version of Mac OS so that the printing subsystem was basically sandboxed from the rest of the system — it has to stay in its own little corner of the world and can’t access anything outside of that. So how do I fix this?

Well, step 1 was to recompile GhostScript. I originally installed GhostScript via Homebrew (using brew install ghostscript). If we know what libraries GhostScript depends on, we can turn them into static libraries; the linker will then bundle those libraries into the application at link time. Fortunately, otool will tell us what libraries the application is linked to:

$ otool -L /usr/local/bin/gs
/usr/local/bin/gs:
/usr/local/opt/libtiff/lib/libtiff.5.dylib (compatibility version 10.0.0, current version 10.0.0)
/usr/lib/libSystem.B.dylib (compatibility version 1.0.0, current version 1252.200.5)
/usr/lib/libiconv.2.dylib (compatibility version 7.0.0, current version 7.0.0)

Oh good — libtiff is really the only one we need to worry about. If we look at /usr/local/opt/libtiff/lib, we can see that there’s both a dynamic library and a static library there. If we just rename the dynamic library, it’ll get ignored at link time and the static version will get compiled in instead. All we need to do is:

$ mv /usr/local/opt/libtiff/lib/libtiff.5.dylib /usr/local/opt/libtiff/lib/libtiff.5.dylib.hidden

Now we can ask Homebrew to compile a new version for us with:

$ brew reinstall ghostscript --build-from-source

We can use otool again to verify that GhostScript no longer needs a separate copy of libtiff:

$ otool -L /usr/local/bin/gs
/usr/local/bin/gs:
/usr/lib/libSystem.B.dylib (compatibility version 1.0.0, current version 1252.250.1)
/usr/lib/libiconv.2.dylib (compatibility version 7.0.0, current version 7.0.0)

Great! Now we just need to be sure to “unhide” the version of libtiff that we just hid:

$ mv /usr/local/opt/libtiff/lib/libtiff.5.dylib /usr/local/opt/libtiff/lib/libtiff.5.dylib.hidden

Now, I took GhostScript’s entire directory and copied it into CUPS’s filter subdirectory (which I probably didn’t need to do, strictly speaking; but I did it anyway):

1
2
3
$ cd /usr/libexec/cups/filter
$ sudo mkdir ghostscript
$ sudo cp -av /usr/local/Cellar/ghostscript/9.26_1/* ghostscript

We also need to be sure to change ownership of everything in that folder:

$ sudo chown -R root:wheel ghostscript

Now I just needed to update my pstopcl wrapper script to point to the new copy of gs:

1
2
#!/bin/bash
/usr/libexec/cups/filter/ghostscript/bin/gs -sDEVICE=pxlcolor -dNOPAUSE -dBATCH -q -sOutputFile=- -

The next issue was that Ghostscript was complaining that it couldn’t find gs_init.ps — so we had to help it out. Ghostscript has a set of directories where it will search for this file compiled in, which we can list with gs --help (output truncated):

Search path:
/usr/local/Cellar/ghostscript/9.26_1/share/ghostscript/9.26/Resource/Init :
/usr/local/Cellar/ghostscript/9.26_1/share/ghostscript/9.26/lib :
/usr/local/Cellar/ghostscript/9.26_1/share/ghostscript/9.26/Resource/Font :
/usr/local/Cellar/ghostscript/9.26_1/share/ghostscript/fonts :
/usr/local/Cellar/ghostscript/9.26_1/share/fonts/default/ghostscript :
/usr/local/Cellar/ghostscript/9.26_1/share/fonts/default/Type1 :
/usr/local/Cellar/ghostscript/9.26_1/share/fonts/default/TrueType :
/usr/lib/DPS/outline/base : /usr/openwin/lib/X11/fonts/Type1 :
/usr/openwin/lib/X11/fonts/TrueType

Ok — so Ghostscript is trying to look in a bunch of Homebrew directories — and since those are owned by my user account, OS X’s sandboxing is probably blocking Ghostscript from being able to access them at print time. Since we copied those directories into CUPS’s filter directory, we just need to adjust the paths; we can then tell Ghostscript to look in those directories. We’ll add in OS X’s fonts folder for good measure:

1
2
#!/bin/bash
/usr/libexec/cups/filter/ghostscript/bin/gs -I/Library/Fonts:/usr/libexec/cups/filter/ghostscript/share/ghostscript/9.26/Resource/Init:/usr/libexec/cups/filter/ghostscript/share/ghostscript/9.26/lib:/usr/libexec/cups/filter/ghostscript/share/ghostscript/9.26/Resource/Font:/usr/libexec/cups/filter/ghostscript/share/ghostscript/fonts:/usr/libexec/cups/filter/ghostscript/share/fonts/default/ghostscript:/usr/libexec/cups/filter/ghostscript/share/fonts/default/Type1:/usr/libexec/cups/filter/ghostscript/share/fonts/default/TrueType:/usr/lib/DPS/outline/base:/usr/openwin/lib/X11/fonts/Type1:/usr/openwin/lib/X11/fonts/TrueType -sDEVICE=pxlcolor -dNOPAUSE -dBATCH -q -sOutputFile=- -

So…this got me partway there. I was able to do a test print that didn’t look like complete garbage…but it did look like garbage (and note, it only took up 1/4 of the page):

So I knew I was getting close — now I know that Ghostscript will run.

I started doing some more searching around. I looked on openprinting.org; it turns out that they already have multiple PPDs for the MP C4502, including one that outputs in PCL. Great! Let’s see if we can get that to work.

Looking at the PPD, I could tell that there were a lot of Foomatic-RIP options in this PPD. I knew the latest version of Foomatic for OS X was a little older and only advertised that it worked up through Mavericks (10.9), and I started contemplating whether I could write a script to stand in for Foomatic; but ultimately I decided to just give Foomatic a try. Turns out, it worked almost out of the box — I didn’t need to do anything.

The PPD has the Ghostscript command line built into it:

*FoomaticRIPCommandLine: "(printf '\033%%-12345X@PJL\n@PJL JOB\n@PJL SET COPIES=&copies;\n'%G|perl -p -e "s/\x26copies\x3b/1/");
(gs -q -dBATCH -dPARANOIDSAFER -dNOPAUSE -dNOINTERPOLATE %B%A%C %D%E | perl -p -e "s/^\x1b\x25-12345X//" | perl -p -e "s/\xc1\x01\x00\xf8\x31\x44/\x44/g");
(printf '@PJL\n@PJL EOJ\n\033%%-12345X')"
*End

So I thought, “ok, maybe I can just get rid of my wrapper script and just plug the contents of the -I switch straight into the PPD”, like so:

*FoomaticRIPCommandLine: "(printf '\033%%-12345X@PJL\n@PJL JOB\n@PJL SET COPIES=&copies;\n'%G|perl -p -e "s/\x26copies\x3b/1/");
(gs -I/Library/Fonts:/usr/libexec/cups/filter/ghostscript/share/ghostscript/9.26/Resource/Init:/usr/libexec/cups/filter/ghostscript/share/ghostscript/9.26/lib:/usr/libexec/cups/filter/ghostscript/share/ghostscript/9.26/Resource/Font:/usr/libexec/cups/filter/ghostscript/share/ghostscript/fonts:/usr/libexec/cups/filter/ghostscript/share/fonts/default/ghostscript:/usr/libexec/cups/filter/ghostscript/share/fonts/default/Type1:/usr/libexec/cups/filter/ghostscript/share/fonts/default/TrueType:/usr/lib/DPS/outline/base:/usr/openwin/lib/X11/fonts/Type1:/usr/openwin/lib/X11/fonts/TrueType -q -dBATCH -dPARANOIDSAFER -dNOPAUSE -dNOINTERPOLATE %B%A%C %D%E | perl -p -e "s/^\x1b\x25-12345X//" | perl -p -e "s/\xc1\x01\x00\xf8\x31\x44/\x44/g");
(printf '@PJL\n@PJL EOJ\n\033%%-12345X')"
*End

Great — I’ve got a PPD ready. Time to install it. I copied the PPD over to OS X’s printers database, like so:

$ sudo -s
Password:
# cd /Library/Printers/PPDs/Contents/Resources
# cat ~/Downloads/Ricoh-Aficio_MP_C4502-pxlcolor-Ricoh.ppd | gzip >RICOH\ Aficio\ MP\ C4502\ PCL.gz
# exit

Now I was able to go into my System Preferences and add the printer. In the PPD, the short name is set to “Ricoh Aficio MP C4502 PXL” — the “PXL” suffix helped me distinguish it from the drivers that are available on the Apple Store.

But…when I tried to print off a test page, it failed with the following:

E [22/May/2019:14:22:06 -0500] Line longer than the maximum allowed (255 characters) on line 53 of /private/etc/cups/ppd/Lanier_MP_C4502___On_VPN.ppd.

Well crap — that list of include directories makes the command line too long. Turns out I needed my wrapper script after all. So, I restored the FoomaticRIPCommandLine back to what it was, then modified my wrapper script to eliminate the duplicate options that were already being supplied by the FoomaticRIPCommandLine:

1
2
#!/bin/bash
/usr/libexec/cups/filter/ghostscript/bin/gs -I/Library/Fonts:/usr/libexec/cups/filter/ghostscript/share/ghostscript/9.26/Resource/Init:/usr/libexec/cups/filter/ghostscript/share/ghostscript/9.26/lib:/usr/libexec/cups/filter/ghostscript/share/ghostscript/9.26/Resource/Font:/usr/libexec/cups/filter/ghostscript/share/ghostscript/fonts:/usr/libexec/cups/filter/ghostscript/share/fonts/default/ghostscript:/usr/libexec/cups/filter/ghostscript/share/fonts/default/Type1:/usr/libexec/cups/filter/ghostscript/share/fonts/default/TrueType:/usr/lib/DPS/outline/base:/usr/openwin/lib/X11/fonts/Type1:/usr/openwin/lib/X11/fonts/TrueType $@ -sOutputFile=- -

And changed the FoomaticRIPCommandLine to point to the wrapper script:

*FoomaticRIPCommandLine: "(printf '\033%%-12345X@PJL\n@PJL JOB\n@PJL SET COPIES=&copies;\n'%G|perl -p -e "s/\x26copies\x3b/1/");
(pstopxl -q -dBATCH -dPARANOIDSAFER -dNOPAUSE -dNOINTERPOLATE %B%A%C %D%E | perl -p -e "s/^\x1b\x25-12345X//" | perl -p -e "s/\xc1\x01\x00\xf8\x31\x44/\x44/g");
(printf '@PJL\n@PJL EOJ\n\033%%-12345X')"
*End

And finally…success! I was able to get a nice test page with crisp text on it:

tl;dr: Here’s the procedure for getting this up and running:

  1. Make sure you have the XCode Command Line tools installed by running xcode-select --install.
  2. Install Homebrew.
  3. Install Foomatic-RIP (you can get it from here).
  4. Download the pxlcolor-Ricoh PPD.
  5. Open the PPD with your favorite text editor. Change *cupsFilter: "application/vnd.cups-pdf 0 foomatic-rip" to *%cupsFilter: "application/vnd.cups-pdf 0 foomatic-rip". (e.g., you’re adding a % near the beginning of the line.)
  6. Run brew install libtiff.
  7. Run mv /usr/local/opt/libtiff/lib/libtiff.5.dylib /usr/local/opt/libtiff/lib/libtiff.5.dylib.hidden (to hide the libtiff dynamic library).
  8. Run brew install --build-from-source ghostscript. (If you already have Ghostscript installed, run brew reinstall --build-from-source ghostscript instead.)
  9. Run otool -L /usr/local/bin/gs. Make sure that libtiff is not shown in the output. (If you get a “command not found” error, you might need to run xcode-select --install first.)
  10. cd /usr/libexec/cups/filter
  11. sudo mkdir ghostscript
  12. sudo cp -av /usr/local/Cellar/ghostscript/*/* ghostscript
  13. sudo chown -R root:wheel ghostscript
  14. sudo nano gswrapper
  15. Paste the following into the new file:
    1
    2
    #!/bin/bash
    /usr/libexec/cups/filter/ghostscript/bin/gs -I/Library/Fonts:/usr/libexec/cups/filter/ghostscript/share/ghostscript/9.26/Resource/Init:/usr/libexec/cups/filter/ghostscript/share/ghostscript/9.26/lib:/usr/libexec/cups/filter/ghostscript/share/ghostscript/9.26/Resource/Font:/usr/libexec/cups/filter/ghostscript/share/ghostscript/fonts:/usr/libexec/cups/filter/ghostscript/share/fonts/default/ghostscript:/usr/libexec/cups/filter/ghostscript/share/fonts/default/Type1:/usr/libexec/cups/filter/ghostscript/share/fonts/default/TrueType:/usr/lib/DPS/outline/base:/usr/openwin/lib/X11/fonts/Type1:/usr/openwin/lib/X11/fonts/TrueType $@ -sOutputFile=- -
  16. Ctrl+O then Enter to save, then Ctrl+X to exit.
  17. sudo chown root:wheel gswrapper
  18. sudo chmod 755 gswrapper
  19. cd /Library/Printers/PPDs/Contents/Resources
  20. sudo cp ~/Downloads/Ricoh-Aficio_MP_C4502-pxlcolor-Ricoh.ppd . (change ~/Downloads/Ricoh-Aficio_MP_C4502-pxlcolor-Ricoh.ppd to wherever you downloaded your PPD to)
  21. sudo nano Ricoh-Aficio_MP_C4502-pxlcolor-Ricoh.ppd
  22. Look for the *FoomaticRIPCommandLine: line. On the line directly below, change gs to gswrapper.
  23. Ctrl+O then Enter to save, then Ctrl+X to exit.
  24. Now open the System Preferences app and go to the Printers & Scanners section. Click on the “+” button to add a new printer.
  25. Find the printer. In my case, I have the printer hooked up to my network, so I clicked on the “IP” tab, then entered the IP address for my printer. (You can use either “Internet Printing Protocol – IPP” or “Line Printer Daemon – LPD”; however, I’ve found that the Line Printer Daemon option works a little better, because OS X doesn’t whine about errors when adding the printer.) In the “Use” drop-down, choose “Select Software”, then find the one named “Ricoh Aficio MP C4502 PXL”. When you’re done, click “Add”.

And you’re done! Print off a test page and enjoy your new printer!
Validating PayPal Webhooks Offline (Almost)

Update 4/9/2021: Now includes a Python example!

PayPal offers the abillity for you to receive webhooks for transaction notifications.  This isn’t exactly new — it was introduced with the REST APIs back in 2013(-ish?).  But for those of you still using IPN, you should know that webhooks has some big advantages over IPN.

First, webhooks provides a more structured way to find out exactly what happened.  Each webhook event includes an event_type — so you can figure out just by looking at that what happened.  Second, PayPal provides APIs to let you create webhooks, retrieve events, replay events, and even see samples of the different event types.  Third, you can have more than one webhook per account — this is a big advantage over IPN, which would only let you have one IPN listener per account.  There are more advantages, but that’s not what I want to focus on for this post.

As with IPN, there’s the question of “how do I know that this webhook event is genuine?”  PayPal has the Verify Webhook Signature API to do this — but what if I want to do it without making another API call?  There is actually a way to do this.

PayPal crytographically signs the webhook event when it’s sent to you — and (almost) all the information that you need to verify the signature (as well as the signature itself) are included in the HTTP post.  Let’s look at the different elements:

First, there are a number of HTTP headers that PayPal includes when it makes the post to your site:

  • PAYPAL-TRANSMISSION-ID is a unique ID (more specifically, a UUID) for the transmission.
  • PAYPAL-TRANSMISSION-TIME is the time when PayPal initiated the transmission of the webhook, in ISO 8601 format.
  • PAYPAL-TRANSMISSION-SIG is the Base64-encoded signature.
  • PAYPAL-CERT-URL is the URL to the certificate which corresponds to the private key that was used to generate the signature.
  • PAYPAL-AUTH-ALGO is the algorithm that was used to generate the signature.  (I’ve only ever seen PayPal use SHA256withRSA, but it’s possible that PayPal might switch in the future if/when SHA256 is broken.)

And lastly, there’s the body of the HTTP post itself — the webhook JSON.

How do you validate the signature?  Well, the signature isn’t based off the body of the webhook itself; rather, it’s based off the following string:

<transmissionid>|<timestamp>|<webhookid>|<crc>

  • <transmissionid> and <timestamp> are the verbatim values given in the PAYPAL-TRANSMISSION-ID and PAYPAL-TRANSMISSION-TIME HTTP headers, respectively.
  • <webhookid> is the ID that PayPal assigned to your webhook when you created it.  You can find this a few different places:
    • If you used the Webhooks API to create the webhook, this would have been the value of /id in the response.
    • You can use the List All Webhooks API to see the webhooks you have registered.  You can grab the webhook ID from there.
    • You can also see your webhooks from developer.paypal.com.  (Go to the Dashboard, then the My Apps & Credentials page.  Scroll down to the REST API Apps section and find your REST app.  Click on it, then scroll down to the “Sandbox Webhooks” or “Live Webhooks” section.  The webhook ID will be displayed in the “Webhook ID” column.)

  • <crc> is the CRC32 of the body of the HTTP post (e.g., the raw, unaltered webhook JSON), and expressed as a base 10, unsigned integer.

Let’s look at a quick example.  Suppose this is what PayPal posted to you.  (This is an actual webhook I received, albeit slightly modified:)

1
2
3
4
5
6
7
8
9
10
11
12
13
14
15
16
17
POST /paypal-webhook-handler HTTP/1.1
Accept: */*
PAYPAL-TRANSMISSION-ID: 6e3b26a0-9287-11e7-ac1e-6b62a8a99ac4
PAYPAL-TRANSMISSION-TIME: 2017-09-05T22:13:22Z
PAYPAL-TRANSMISSION-SIG: Hdwao5lBJ9R6IX1JgOuyKdA1oyw2edUGhJ4ovHDqA7XXJS9BvVMQJL/51nXzVu5mI0iDTfkXk8XophZnkXB+srwtdxkjjIeW+fNMsp9qsI64gywFK40AqD6YvyIbbBhGm8SPecfVGOWYeAy16jHx/6F6e/wxeSClM8XcQMrp6jwy5NZRyD/0BsijjI6KQedonrg6jiq3BqrzbvIyuMW32DtiqXPg/2Inog0ZItpTmHDu71Xci6zgiTmb4BsKHX/vyBwRZE6wo4NwtiP1NoNr+l32H3JCAvOvjvPRBAFbaG+SKjUGn3NL8nV3EQGXV20rJI4l5wWRYh5C4DBzppXgkA==
PAYPAL-AUTH-VERSION: v2
PAYPAL-CERT-URL: https://api.sandbox.paypal.com/v1/notifications/certs/CERT-360caa42-fca2a594-aecacc47
PAYPAL-AUTH-ALGO: SHA256withRSA
Content-Type: application/json
User-Agent: PayPal/AUHD-211.0-33754056
Host: www.bahjeez.com
correlation-id: 42e699ec204cc
CAL_POOLSTACK: amqunphttpdeliveryd:UNPHTTPDELIVERY*CalThreadId=0*TopLevelTxnStartTime=15e541b2066*Host=slcsbamqunphttpdeliveryd3002
CLIENT_PID: 21282
Content-Length: 965

{"id":"WH-36687761JL817053T-6SY78077XN391202M","event_version":"1.0","create_time":"2017-09-05T22:13:22.000Z","resource_type":"payouts","event_type":"PAYMENT.PAYOUTSBATCH.SUCCESS","summary":"Payouts batch completed successfully.","resource":{"batch_header":{"payout_batch_id":"2AZEQUD4YPAEJ","batch_status":"SUCCESS","time_created":"2017-09-05T22:12:56Z","time_completed":"2017-09-05T22:13:22Z","sender_batch_header":{"sender_batch_id":"2017021897"},"amount":{"currency":"USD","value":"1.0"},"fees":{"currency":"USD","value":"0.0"},"payments":1},"links":[{"href":"https://api.sandbox.paypal.com/v1/payments/payouts/2AZEQUD4YPAEJ","rel":"self","method":"GET"}]},"links":[{"href":"https://api.sandbox.paypal.com/v1/notifications/webhooks-events/WH-36687761JL817053T-6SY78077XN391202M","rel":"self","method":"GET"},{"href":"https://api.sandbox.paypal.com/v1/notifications/webhooks-events/WH-36687761JL817053T-6SY78077XN391202M/resend","rel":"resend","method":"POST"}]}

In this example:

  • <transmissionid> would be 6e3b26a0-9287-11e7-ac1e-6b62a8a99ac4.
  • <timestamp> would be 2017-09-05T22:13:22Z.  (Remember — use the exact value that PayPal passed to you.  Don’t try to change this into your local timezone or change its format.)
  • <id> would be my webhook ID, which in this case is 2R269424P6803053B.
  • <crc> would be 1330495958.

Which means that the string PayPal signed would be:

6e3b26a0-9287-11e7-ac1e-6b62a8a99ac4|2017-09-05T22:13:22Z|2R269424P6803053B|1330495958

The last thing to do is to verify the signature.

So far, we’ve been able to do everything without pulling in any external resources, but unfortunately that ends here.  To verify the signature, we need a copy of the certificate that corresponds to the private key that was used to generate the signature.  PayPal provided us a URL where we can fetch that certificate (in the PAYPAL-CERT-URL header) — we’ll need to fetch a copy of that.  Bad news is that means pulling in an outside resource (which will slow down the verification process); good news is that the certificates don’t change that often (in fact, I’ve only ever seen PayPal use one certificate), so you can cache the certificate for future use.

The only thing that’s left is to verify the signature against the string we formed above.  I won’t get into specifics on this — each language has their own way of pulling this off.  Java has built-in classes and methods that will help you out with this; for PHP, you can use the built-in OpenSSL functions to help you out.

If the signature verification is successful, and you trust the certificate that was used to sign the message, then you can be sure that the message you’re receiving is genuine.

Side note: there’s a weakness here in that CRC32 is used to hash the actual message body.  CRC32 isn’t a secure hashing algorithm (not sure it was ever meant to be), so I’m not sure why PayPal decided to use that instead of something like SHA256.  (Edit: I’m told something new is in the works.)

Anywho…I wrote a couple of example implementations.  Note that these examples don’t cache the certificates — you’ll need to figure out how to do that on your own.  But, feel free to use what I have.

First, a PHP example:

1
2
3
4
5
6
7
8
9
10
11
12
13
14
15
16
17
18
19
20
21
22
23
24
25
26
27
28
29
30
31
32
33
34
35
36
37
38
39
40
41
42
43
44
45
46
47
48
49
50
51
52
53
54
55
56
57
58
59
60
61
62
63
64
65
66
67
68
69
70
71
72
73
74
75
76
77
78
79
80
81
82
83
84
85
86
87
88
89
90
91
92
93
94
95
96
97
98
99
100
101
102
103
104
105
106
107
108
109
110
111
112
113
114
115
116
117
118
119
120
121
122
123
124
125
<!--?php

$headers = apache_request_headers();

$cert_url = $headers[ 'PAYPAL-CERT-URL' ];
$transmission_id = $headers[ 'PAYPAL-TRANSMISSION-ID' ];
$timestamp = $headers[ 'PAYPAL-TRANSMISSION-TIME' ];
$algo = $headers[ 'PAYPAL-AUTH-ALGO' ];
$signature = $headers[ 'PAYPAL-TRANSMISSION-SIG' ];
$webhook_id = "09A5628866464184S"; // Replace with your webhook ID

$webhook_body = file_get_contents( 'php://input' );

try {
  if( verify_webhook( $cert_url, $transmission_id, $timestamp, $webhook_id, $algo, $signature, $webhook_body ) ) {
    // Verification succeeded!
  } else {
    // Verification failed!
  }
} catch(Exception $ex) {
  // Something went wrong during verification!
}

/**
 * Verifies a webhook from PayPal.
 *
 * @param string $cert_url The URL of the certificate that corresponds to the
 *                         private key that was used to sign the certificate.
 *                         When the webhook is posted to you, PayPal provides
 *                         this in the PAYPAL-CERT-URL HTTP header.
 * @param string $transmission_id The transmission ID for the webhook event.
 *                                When the webhook is posted to you, PayPal
 *                                provides this in the PAYPAL-TRANSMISSION-ID
 *                                HTTP header.
 * @param string $timestamp The timestamp of when the webhook was sent. When
 *                          the webhook is posted to you, PayPal provides
 *                          this in the PAYPAL-TRANSMISSION-TIME HTTP header.
 * @param string $webhook_id The webhook ID assigned to your webhook, as
 *                           defined in your developer.paypal.com dashboard.
 *                           If you used the Create Webhook API to create your
 *                           webhook, this ID was returned in the response to
 *                           that call.
 * @param string $signature_algorithm The signature algorithm that was used to
 *                                    generate the signature for the webhook.
 *                                    When the webhook is posted to you, PayPal
 *                                    provides this in the PAYPAL-AUTH-ALGO
 *                                    HTTP header.
 * @param string $webhook_body The byte-for-byte body of the request that
 *                             PayPal posted to you.
 *
 * @return bool Returns true if the webhook could be successfully verified, or
 *              false if it was not.
 *
 * @throws Exception if an error occurred while attempting to verify the
 *     webhook.
 */

function verify_webhook( $cert_url, $transmission_id, $timestamp, $webhook_id, $signature_algorithm, $signature, $webhook_body ) {
  // This is used to translate the hash methods provided by PayPal into ones that
  // are known by OpenSSL...right now the only one we've seen PayPal use is 'SHA256withRSA'
  $known_hash_methods = [
    'SHA256withRSA' => 'sha256WithRSAEncryption'
  ];

  if( array_key_exists( $signature_algorithm, $known_hash_methods ) ) {
    $algo = $known_hash_methods[ $signature_algorithm ];
  } else {
    $algo = $signature_algorithm;
  }

  // Make sure OpenSSL knows how to handle this hash method
  $openssl_algos = openssl_get_md_methods( true );
  if( !in_array( $algo, $openssl_algos ) ) {
    throw new Exception( "OpenSSL doesn't know how to handle message digest algorithm "$algo"" );
  }

  // Fetch the cert -- we have to use cURL for this because PHP's built-in
  // capability for opening http/https URLs uses HTTP 1.0, which PayPal doesn't
  // support
  $curl = curl_init( $cert_url );
  curl_setopt( $curl, CURLOPT_RETURNTRANSFER, true );
  $cert = curl_exec( $curl );

  if( false === $cert ) {
    $error = curl_error( $curl );
    curl_close( $curl );
    throw new Exception( "Failed to fetch certificate from server: $error" );
  }

  curl_close( $curl );

  // Parse the certificate
  $x509 = openssl_x509_read( $cert );
  if( false === $x509 ) {
    throw new Exception( "OpenSSL was unable to parse the certificate from PayPal\n" );
  }

  // Calculate the CRC32 of the webhook body
  $crc = crc32( $webhook_body );

  // Assemble the string that PayPal actually signed
  $sig_string = sprintf( '%s|%s|%s|%u', $transmission_id, $timestamp, $webhook_id, $crc );

  // Base64-decode PayPal's signature
  $decoded_signature = base64_decode( $signature );

  // Fetch the public key from the certificate
  $pkey = openssl_pkey_get_public( $cert );
  if( false === $pkey ) {
    throw new Exception( "Failed to get public key from PayPal certificate\n" );
  }

  // Verify the signature
  $verify_status = openssl_verify( $sig_string, $decoded_signature, $pkey, $algo );

  openssl_x509_free( $x509 );

  // Check the status of the verification
  if( $verify_status == 1 ) {
    return true;
  } else if( $verify_status == -1 ) {
    throw new Exception( "Error occurred while trying to verify webhook signature" );
  } else {
    return false;
  }
}

And second, a Java servlet (written for Apache Tomcat 8):

1
2
3
4
5
6
7
8
9
10
11
12
13
14
15
16
17
18
19
20
21
22
23
24
25
26
27
28
29
30
31
32
33
34
35
36
37
38
39
40
41
42
43
44
45
46
47
48
49
50
51
52
53
54
55
56
57
58
59
60
61
62
63
64
65
66
67
68
69
70
71
72
73
74
75
76
77
78
79
80
81
82
83
84
85
86
87
88
89
90
91
92
93
94
95
96
97
98
99
100
101
102
103
104
105
106
107
108
109
110
package com.bahjeez;

import java.io.IOException;
import java.net.URL;
import java.security.InvalidKeyException;
import java.security.NoSuchAlgorithmException;
import java.security.Signature;
import java.security.SignatureException;
import java.security.cert.CertificateException;
import java.security.cert.CertificateFactory;
import java.security.cert.X509Certificate;
import java.util.Base64;
import java.util.stream.Collectors;
import java.util.zip.CRC32;

import javax.servlet.ServletException;
import javax.servlet.annotation.WebServlet;
import javax.servlet.http.HttpServlet;
import javax.servlet.http.HttpServletRequest;
import javax.servlet.http.HttpServletResponse;

/**
 * Servlet implementation class ValidateWebhook
 */

@WebServlet(name = "ValidateWebhook", urlPatterns = { "/ValidateWebhook" })
public class ValidateWebhook extends HttpServlet {
    private static final long serialVersionUID = 1L;

    /**
     * @see HttpServlet#HttpServlet()
     */

    public ValidateWebhook() {
        super();
    }

    public static boolean verifySignature(String webhookBody, String certUrl, String transmissionId, String transmissionTimestamp, String authAlgo, String signature, String webhookId) throws Exception {

        CertificateFactory fact;
        try {
            fact = CertificateFactory.getInstance("X.509");
        } catch (CertificateException e) {
            throw new Exception("Failed to construct CertificateFactory object");
        }

        URL url = new URL(certUrl);
        X509Certificate cer;
        try {
            cer = (X509Certificate) fact.generateCertificate(url.openStream());
        } catch (CertificateException e) {
            throw new Exception("Failed to create X509Certificate object");
        }

        Signature sigAlgo;
        try {
            sigAlgo = Signature.getInstance(authAlgo);
        } catch (NoSuchAlgorithmException e) {
            throw new Exception("Failed to initialize Signature object (maybe unrecognized signature algorithm?)");
        }

        CRC32 crc = new CRC32();
        crc.update(webhookBody.getBytes());

        String verifyString = transmissionId + "|" + transmissionTimestamp + "|" + webhookId + "|" + crc.getValue();

        try {
            sigAlgo.initVerify(cer);
        } catch (InvalidKeyException e) {
            throw new Exception("Failed to initialize signature verification");
        }

        try {
            sigAlgo.update(verifyString.getBytes());
        } catch (SignatureException e) {
            throw new Exception("Failed to update signature verification object");
        }

        byte[] actualSignature = Base64.getDecoder().decode(signature);
        try {
            return sigAlgo.verify(actualSignature);
        } catch (SignatureException e) {
            throw new Exception("Failed to verify signature");
        }
    }

    /**
     * @see HttpServlet#doPost(HttpServletRequest request, HttpServletResponse response)
     */

    protected void doPost(HttpServletRequest request, HttpServletResponse response) throws ServletException, IOException {
        String webhookBody = request.getReader().lines().collect(Collectors.joining());
        String certUrl = request.getHeader("PAYPAL-CERT-URL");
        String transmissionId = request.getHeader("PAYPAL-TRANSMISSION-ID");
        String transmissionTimestamp = request.getHeader("PAYPAL-TRANSMISSION-TIME");
        String authAlgo = request.getHeader("PAYPAL-AUTH-ALGO");
        String signature = request.getHeader("PAYPAL-TRANSMISSION-SIG");
        String webhookId = "24N36863A45710219";

        try {
            if(this.verifySignature(webhookBody, certUrl, transmissionId, transmissionTimestamp, authAlgo, signature, webhookId)) {
                response.setStatus(200);
            } else {
                response.setStatus(400);
                response.getWriter().write("Failed to verify signature on incoming webhook");
            }
        } catch(Exception ex) {
            response.setStatus(500);
            response.getWriter().write("Failed to verify signature due to internal error: " + ex.getMessage());
        }
    }

}

And finally, a third example written for Python 3. This example will need the cryptography library (pip install cryptography) and the requests library (pip install requests).

1
2
3
4
5
6
7
8
9
10
11
12
13
14
15
16
17
18
19
20
21
22
23
24
25
26
27
28
29
30
31
32
33
34
35
36
37
38
39
40
41
42
43
44
45
46
47
48
49
50
51
52
53
54
55
56
57
58
59
60
61
62
63
64
65
66
67
68
69
70
71
72
73
74
75
76
77
78
79
80
81
82
83
84
85
86
87
88
89
90
91
92
93
94
95
96
97
98
99
100
101
102
103
104
105
106
107
108
109
110
111
112
113
114
115
116
117
118
119
120
121
122
123
124
125
126
127
128
129
130
131
132
133
134
135
136
137
138
139
140
141
142
143
144
145
146
147
148
149
150
151
152
153
154
155
156
157
158
159
160
161
162
163
164
165
166
167
168
169
170
171
172
173
174
#!/usr/bin/env python3

import http.server as SimpleHTTPServer
import socketserver as SocketServer
import logging
import pprint
import zlib
import json
import os.path
import requests
from cryptography import x509
from cryptography.hazmat.primitives import hashes
from cryptography.hazmat.primitives.asymmetric import padding
from cryptography.hazmat import backends
import base64

PORT = 8000

# This example caches the PayPal signing certs, as they don't change very often
CERT_FILE_CACHE = './cert_cache.json'

# Set to your webhook ID
#
# If you created the webhook through the developer.paypal.com site, the webhook
# ID is shown on the details page for your REST API application.
#
# If you created the webhook through the POST /v1/notification/webhooks API,
# the ID is returned in the response.  You can also use the
# GET /v1/notifications/webhooks API if you forgot the webhook ID.
WEBHOOK_ID = ''

class GetHandler(
        SimpleHTTPServer.SimpleHTTPRequestHandler
        ):

    def fetchPayPalCert(self, url):
        # Assumes that the cert doesn't already exist in the cache
        # Also assumes that the cert it's fetching is genuine
        r = requests.get(url)
        if r.status_code >= 400:
            raise Exception("Unable to fetch certificate")

        certdata = r.text

        if not os.path.exists(CERT_FILE_CACHE):
            cache = {'certs': [{'url': url, 'cert': certdata}]}
            cache_file = False
            try:
                cache_file = open(CERT_FILE_CACHE, 'w')
                json.dump(cache, cache_file)
            except:
                # Just ignore it, we made a best effort
                pass

            cache_file.close()

            return certdata
        else:
            try:
                cache_file = open(CERT_FILE_CACHE)
                cache_json = json.load(cache_file)
                cache_file.close()

                new_cache = {'certs':[]}

                if 'certs' in cache_json:
                    for cert in cache_json['certs']:
                        if 'url' in cert and 'cert' in cert:
                            new_cache['certs'].append(cert)

                new_cache['certs'].append({'url':url, 'cert':certdata})

                cache_file = open(CERT_FILE_CACHE, 'w')
                json.dump(new_cache, cache_file)
                cache_file.close()
            except:
                # Just ignore it, we made a best effort
                pass

        return certdata

    def getPayPalCert(self, url):
        if not os.path.exists(CERT_FILE_CACHE):
            return self.fetchPayPalCert(url)

        cache_json = False
        cache_file = False
        try:
            cache_file = open(CERT_FILE_CACHE)
            cache_json = json.load(cache_file)
        except:
            cache_file.close()
            return self.fetchPayPalCert(url)

        cache_file.close()

        if "certs" in cache_json:
            for cert in cache_json["certs"]:
                if "url" in cert and cert["url"] == url and "cert" in cert:
                    return cert["cert"]

        return self.fetchPayPalCert(url)

    def do_POST(self):
        self.close_connection = True

        # Check for required headers
        required_headers = (
            'Content-Length',
            'Content-Type',
            'PAYPAL-TRANSMISSION-ID',
            'PAYPAL-TRANSMISSION-TIME',
            'PAYPAL-TRANSMISSION-SIG',
            'PAYPAL-CERT-URL',
            'PAYPAL-AUTH-ALGO'
            )

        for header in required_headers:
            if header not in self.headers:
                self.send_response(400)
                self.end_headers()
                self.wfile.write(("Required header missing from request: " + header).encode())
                return

        content_type = self.headers['Content-Type']
        if content_type != "application/json":
            self.send_response(400)
            self.end_headers()
            self.wfile.write("Invalid Content-Type".encode())
            return

        content_length = int(self.headers['Content-Length'])
        transmission_id = self.headers['PAYPAL-TRANSMISSION-ID']
        transmission_time = self.headers['PAYPAL-TRANSMISSION-TIME']
        transmission_sig = base64.b64decode(self.headers['PAYPAL-TRANSMISSION-SIG'])
        cert_url = self.headers['PAYPAL-CERT-URL']
        auth_algo = self.headers['PAYPAL-AUTH-ALGO']
        body = self.rfile.read(content_length)

        if auth_algo != 'SHA256withRSA':
            self.send_response(400)
            self.end_headers()
            self.wfile.write(("Don't know how to handle signing algorithm " + auth_algo).encode())
            return

        checksum = zlib.crc32(body)
        verify_str = transmission_id + "|" + transmission_time + "|" + WEBHOOK_ID + "|" + format(checksum)
        cert_data = self.getPayPalCert(cert_url)

        cert = x509.load_pem_x509_certificate(cert_data.encode('ascii'), backend=backends.default_backend())
        public_key = cert.public_key()

        try:
            public_key.verify(
                transmission_sig,
                verify_str.encode("ascii"),
                padding.PKCS1v15(),
                hashes.SHA256()
            )
        except:
            self.send_response(400)
            self.end_headers()
            self.wfile.write("Signature verification failed".encode())
            return

        # If you've made it to this point, then verification succeeded -- you can proceed to
        # parse out the webhook
        self.send_response(204)
        self.end_headers()

Handler = GetHandler
httpd = SocketServer.TCPServer(("", PORT), Handler)

httpd.serve_forever()

Recurring Payments IPNs

I originally posted this article to x.com on August 3, 2010. Since that time, x.com has been repurposed, and my posts have been taken down. I have reposted this here for informational and historical purposes.

(Updated 8/9/2010 to include recurring_payment_expired)

There are several different values for the txn_type variable in an IPN message that are related to Recurring Payments:

  • recurring_payment
  • recurring_payment_failed
  • recurring_payment_expired
  • recurring_payment_suspended_due_to_max_failed_payment
  • recurring_payment_profile_created
  • recurring_payment_profile_cancel
  • recurring_payment_outstanding_payment_failed
  • recurring_payment_outstanding_payment
  • recurring_payment_skipped

But, what do they all mean?

At one point in time, one of my merchants asked me this same question.  I had a hell of a time (pardon my French) finding the answer — especially recurring_payment_skipped, which seems to be a pain point for many developers.  Eventually, through talking to people internally and doing test cases, I managed to find the answers.  I’ve had enough people ask me this same question that having the answer sitting around has been extremely useful.

  • When the recurring payments profile is created, you receive an IPN with txn_type set to recurring_payment_profile_created.
  • For each successful payment, you receive an IPN with txn_type set to recurring_payment.
  • For each unsuccessful payment, you receive an IPN with txn_type set to recurring_payment_failed. The outstanding_balance field will have the amount currently outstanding.
  • When the maximum number of failed payments is reached (as specified in the MAXFAILEDPAYMENTS parameter in your CreateRecurringPaymentsProfile call), you receive an IPN with txn_type set to recurring_payment_suspended_due_to_max_failed_payment. This is the only IPN you receive (e.g., if MAXFAILEDPAYMENTS was set to 1, you only receive this IPN on the failed payment; you do not receive another one with txn_type of recurring_payment_failed).
  • If the recurring payments profile is cancelled, you receive an IPN with txn_type set to recurring_payment_profile_cancel.
  • When the profile has “expired” (e.g., there are no more payments left on the profile, and the amount of time since the last payment plus the billing period has elapsed), you will get another IPN with txn_type set to recurring_payment_expired.  This is intended to be a “reminder” to you that the buyer’s subscription is up, and to deactivate their service.  For example, if you create a recurring payments profile on the 16th of the month, with a billing period of one month, and the profile is cancelled on the 28th of the month, you will get an IPN on the 28th with txn_type of recurring_payment_profile_cancel, and another IPN on the 16th of the next month with recurring_payment_expired.

    Edit 3/8/2011: It’s been brought to my attention that recurring_payment_expired is only sent for Website Payments Standard subscriptions.  I’m not entirely clear on all the details, but it appears that newer profiles (ones where the subscription ID starts with “I-“) will send recurring_payment_expired, whereas older profiles (ones where the subscription ID starts with “S-“) will send subscr_eot.

  • If you call BillOutstandingAmount, the resulting IPN will have txn_type set to either recurring_payment_outstanding_payment_failed or recurring_payment_outstanding_payment. (Remember that if the profile has been suspended, you will need to call ManageRecurringPaymentsProfileStatus to reactivate the profile.)
  • When you receive an IPN with txn_type set to recurring_payment_skipped, this means that, for some reason, PayPal was not able to process the recurring payment.  This does not necessarily mean that the buyer’s credit card (or other funding source) was declined, but rather, it indicates that some other error occurred that prevented us from processing the payment.  Because there are multiple reasons why this could happen, PayPal will make three attempts to charge the buyer — once after three days, and again five days after that.  If the 3-day reattempt fails you will receive another IPN with txn_type set to recurring_payment_skipped.  If the 5-day reattempt fails, the payment will be considered a failed payment, and you will receive an IPN with txn_type set to either recurring_payment_failed or recurring_payment_suspended_due_to_max_failed_payment, depending on how you set up the profile.

International Address Formats

I originally posted this article to x.com on September 21, 2010. Since that time, x.com has been repurposed, and my posts have been taken down. I have reposted this here for informational and historical purposes.

I know, both first and second-hand, that there is a lot of confusion over exactly what data needs to be passed for addresses in foreign countries.  In this post, I’ll try to lay out each country’s specific rules.  This is going to be a work-in-progress, as I don’t anticipate having every country shown on this list right off the bat, but I hope that I’m doing some good by putting it out there.

Please be aware that much of this information was gathered from internal sources, and although I believe it to be correct, I haven’t had time to test out every country to make sure that it’s 100% correct.  So please, if you find something here that turns out to be incorrect, please let me know so that I can get it fixed!  (I’d rather be right than wrong any day!)  Just leave a comment at the bottom of the page.

Any time I make reference to fields such as STREET, STREET2, CITY, STATE, ZIP, and COUNTRYCODE, please assume that they will correspond to the fields for the specific API call and language (NVP or SOAP) that you are using.

Also, any time I specify the format for ZIP, N should be a numeric character (0-9), and X should be an alphabetic character (A-Z).

Lastly, you may not be required to pass any address information at all.  If a particular country is giving you problems, try running an API call without passing any address information at all — if the transaction succeeds, then you can work around the issue by simply not passing the address.

P.S. — There’s been some attempts before to compile information like this.  See here (link broken) and here (link broken) for more information.  There’s also a list of country codes (we use the ISO 3166-1 alpha-2 codes) here or here.

Australia

  • You need to pass STREET, CITY, and ZIPSTATE is optional.  If you do supply a STATE, it should be the full state name (e.g., Northern Territory).
  • ZIP should be specified as NNNN.

Canada

  • You need to pass STREET, CITY, STATE, and ZIP.
  • STATE should be set to the province’s two-character abbreviation (ex.: QC).
  • ZIP should be specified as XNXNXN.

France

  • You need to pass STREET, CITY, and ZIPSTATE is not required.
  • ZIP should be specified as NNNNN.

Germany

  • You need to pass STREET, CITY, and ZIPSTATE is not required.
  • ZIP should be specified as NNNNN.

Italy

  • You need to pass STREET, CITY, and ZIPSTATE is optional.  If you do supply a STATE, it should be the two-character province abbreviation (ex.: GE).
  • ZIP should be specified as NNNNN.

Japan

  • You need to pass STREET, CITY, and ZIPSTATE is required only for shipping addresses (if you specify one).  It is not required for billing addresses.
  • The address should be romanized.
  • STATE should be set to the full prefecture name (ex.: Tokyo).
  • CITY should be set to the municipality.
  • STREET should be the location within the municipality (e.g., the rest of the address).
  • ZIP should be specified as NNN-NNNN.
  • For DoDirectPayment calls on the Sandbox, omit the state, as anything else causes an error.  Leave the shipping address off altogether.  (If you’re really adamant about testing it with a state and/or shipping address, set STATE to JP-40.)

As an example, the address of the Tokyo Central Post Office is:

Tokyo Central Post Office
5-3, Yaesu 1-Chome
Chuo-ku, Tokyo 100-8994

In this scenario, I would set my variables accordingly:

  • STREET=”5-3, Yaesu 1-Chome”
  • CITY=”Chuo-ku”
  • STATE=”Tokyo”
  • ZIP=”100-8994″

Spain

  • You need to pass STREET, CITY, and ZIPSTATE is optional.  If you do pass a STATE, it should be the full province name, with accented characters translated into their non-accented equivalents (ex.: Avila).
  • ZIP should be specified as NNNNN.

Sweden

  • You need to pass STREET and CITYSTATE is not required.  ZIP is optional.
  • If you do pass a ZIP, it should be specified as NNNNN.

United Kingdom

  • You only need to pass STREET, CITY, and ZIPSTATE is optional.  If you do pass a STATE, it should be the county name (ex.: West Sussex).
  • Make sure you set COUNTRYCODE to GB, not UK!  (If you look at ISO 3166-1, the United Kingdom specifically reserved it so that no one else would use it, but it’s still not their official country code.)  Passing UK results in a nasty user experience for your buyers.
  • There’s not a good way to describe the format for ZIP, so I’ll just say go look at the Wikipedia article.

United States

  • You need to pass STREET, CITY, STATE, and ZIP.
  • STATE should be the state’s two-character abbreviation (ex.: NY)
  • ZIP should be either the 5 or 9-digit ZIP code, in the format NNNNN, NNNNN-NNNN, NNNNNNNNN, or NNNNN NNNN.

My Experience With CLEAR

Yesterday, a coworker and I went through San Jose-Mineta International Airport to catch a flight home from a business trip.  When we arrived and saw how long the lines were for the security checkpoint, we had a little bit of an “oh shit” moment: we had arrived an hour and a half early — plenty of time to check our bags and get through security — but we thought we were arriving during an off-peak time and didn’t expect the lines to be quite *that* long.  (There were maybe 150-200 people in line, I’m guessing.)  I didn’t have any bags to check, so I told my coworker, “yeah, I’m going to get in line now,” and proceeded to the security checkpoint.

As I got in line, a lady came up to me and offered to sign me up for CLEAR — she said it would only take 3-4 minutes to sign up, I’d get the first month free, and that it would let me bypass the long lines.  That sounded good to me, so I said “sure”.

There was a two-part process: part one was applying for the CLEAR (presumably, something I’d only ever have to do once, or at worst, maybe once a year).  The lady walked me over to a nearby terminal, where she logged in and started the signup process.  They collected the following information from me:

  • Basic info — name, address, email address, phone number
  • Scanned a copy of my driver’s license (both front and back)
  • Credit card (cause the service costs money — but at this point, I didn’t know how much)
  • Fingerprints — from all 10 fingers
  • Photo of my face
  • Social security number — followed by an identity check (you know…where they ask you questions about stuff that’s on your credit report — in my case, “which of these streets have you previously lived on” and “how old is your sister”…which is a little creepy)

After the registration was complete, it was time for part two — actually going through the line.  They walked me over to a separate line, where I bypassed the rest of the people in line for the security checkpoint.  I came up to a couple of terminals, where there were maybe two or three people in front of me.  Once I got to the terminal, I scanned my boarding pass and provided fingerprints from two of my fingers.  The machine quickly said I was all set to go, so they then walked me into a special screening line.  (This part was a little clumsy, because I had to walk past the TSA agents — the ones that check your ID and boarding pass — and I had to go past them in the opposite direction that one would normally go in when going past these people.  Also it was slightly crowded.)  From here, they routed us to a line with an X-ray machine and a walk-through metal detector; we were asked to put our bags on the line to be X-rayed, but they said “everything stays in your bag”.  Do I need to take my laptop out?  Nope.  Do I need to take my baggie of fluids out?  Nope.  Do I need to take my shoes off?  Nope.  Do I need to take my belt off?  Nope.  Do I need to empty my pockets?  Nope — just go through the metal detector.  On the first trip through, I set off the metal detector, so they had me empty my pockets (big whoop — two cell phones and a wallet), put them on the X-ray belt, and go back through.  I didn’t set it off that time, so they waved me through.  I picked up my possessions from the X-ray belt and proceeded out of the checkpoint.

As I exited the checkpoint, my thoughts turned to my coworker.  “I wonder how much time I just saved,” I thought to myself.  He had to check a bag, but that hadn’t taken him very long — I remembered seeing him in line as I was walking through the “special” line — so I pulled out my phone and started my stopwatch.  And then I waited.  Finally, I saw him emerge from the checkpoint — and when I pulled out my phone, I saw that my stopwatch had been running for 21 minutes.

So, what’s my impression of CLEAR?

  • They ask for an awful lot of personal information to make this process work.  On top of that, the person that recruited me didn’t exactly explain how this information was going to be used (past “the credit card is used to pay for the service”).  I suppose it’s understandable, given that it’s airport security, although it’s sad that we have to surrender all but our DNA samples to the government in order to get on a plane nowadays.
  • It was nice not having to unpack half of my bags, take off half of my clothes, or go through the Backscatter X-Ray Scanner of Certain Doom 5000.  (The “5000” makes it sound cooler than its predecessor, the Backscatter X-Ray Scanner of Certain Doom 666.  Travelers — especially the more evangelical ones — didn’t respond well to that, a fact that *somehow* failed to come out during consumer testing.)  I did feel like CLEAR improved that part of the process and made me feel more like a real human being.
  • The price of this service was a bit hefty.  (Notice how the girl that recruited me didn’t tell me how much it was?  There was probably a reason for that.)  As I was walking through the airport to my gate, I got an email telling me how much the service was going to be if I didn’t cancel in the next 28 days — $179.  (Turns out, that’s a per-year charge.)  Unfortunately, this is the second time I’ve traveled this year, so the cost/benefit ratio here doesn’t work in their favor.  When I went to cancel (more on that below), they offered me a discounted rate of $109 per year; however, even that is considerably more expensive than TSA Pre✓ (which is $85 for 5 years, as of this writing — which works out to $17 per year), and doesn’t really offer much of an advantage over TSA Pre✓.
  • CLEAR isn’t available everywhere — in fact, it’s available in very few airports right now (13, as of the time of this writing, with Seattle listed as “Coming Soon”).  Their website has a map showing where they’re available, and even includes a draggable pin that you can drag to the airport where you want them to be available.  However, you can only drag the pin to locations that they’ve pre-defined, and my home airport isn’t one of those choices — which tells me that they’re not going to be available where I am anytime soon.  Having them available in my home airport would make their service doubly useful, as I would be able to use them on both my outgoing flight and my return flight (assuming I’m going through an airport where they’re set up).
  • When I went to their website to cancel, the process was a little clunky.
    • At first, I started up a chat window with them, which sat there and did nothing for at least 20 minutes.  I chalked it up to issues with my company firewall, so I closed it out and didn’t think much of it.
    • Later in the day, I got an email from them that had a “Manage my account” link in it, so I clicked it and tried to log in.  I didn’t know what my password was (the application process didn’t ask me for one), so I used their password feature, which went fairly smoothly.  Once I was logged in, I got an error page (haha, now I know you guys are using force.com!) that wouldn’t go away, even if I logged out and logged back in.
    • Finally, I resorted to trying the web chat again.  This time, it worked and I got a hold of “Tanyia M” immediately.  “She” was very helpful and got my subscription canceled; however, her responses came back to me so quickly that I’m not sure of Tanyia is an actual person or one of our impending bot overlords.

Overall, I liked the experience, but I think this service would be more worth it if I were a frequent traveler with money to burn — or if the service had a much better price point.  As it is, my company is allowing me to travel less and less, so this just doesn’t make it worth it to me.  I don’t think the time savings, when compared to TSA Pre✓, would have been that significant — especially given that I usually show up to the airport far earlier than I need to.  In fact, I just learned that TSA Pre✓ is $85 for 5 years (I thought it was $79 for 1 year), so that option just became a lot more tempting.

Persisting the Volume on the Polycom VVX 500 with a USB Headset

I’m sharing this because this took me forever to figure out, and I’m hoping that this bit of information does someone some good.

I have a Polycom VVX 500 VoIP phone.  This phone is USB enabled, and it so far it’s recognized every USB headset I’ve plugged into it (which has probably been two); however, when I plugged in my headset, the volume would reset to the median setting after every call.  It wouldn’t do that when I connected it through the headset port, however, so I just plugged it in via the headset port and left well enough alone.

That changed today, as I picked up a Plantronics Voyager Legend headset.  The headset only came with a small USB dongle — no way to wire it into the headset jack on the phone.  That’s fine — it’s working great so far, I love the way it fits, I love how well it works with the phone, and I love that it came with its own carrying case — that doubles as a battery-powered charger!  But, my old problem resurfaced — each time I make a call, the volume resets to the middle setting.

After scouring around the web today, I finally found a helpful answer on the Polycom forums, which also describes why this setting even exists in the first place (apparently, some countries have laws that require the phone’s volume to reset to its default setting after each call).  Here’s how to make it work:

  1. You’ll need to enable the web interface, if you haven’t done so already.  To do this, go into the settings app and go to Advanced (the default admin password is 456)->Administration Settings->Web Server Configuration->Web Server and set it to Enabled.  Set Web Config Mode to something other than Disabled (I suggest setting it to HTTP Only.)  Exit out of the menu.  (The phone will probably reboot at this point.  Wait for it to come back up before proceeding to the next step.)
  2. On your computer, pull up a web browser and type in the phone’s IP address.  (You can find this in the settings app under Status->Network->TCP/IP Parameters.)
  3. Log in as the admin user (again, the default password is 456).
  4. Go to Utilities->Import & Export Configuration.
  5. In your favorite text editor, create a file with the following contents (yes, it’s just one line):
    <Volume voice.volume.persist.usbHeadset="1"/>
  6. Under Import Configuration, click Choose File.  Choose the file you created in the previous step, and click Import.

Now you should be done!  The phone should remember your volume preferences between calls now.